
Classic Sourdough Bread

If I were to recommend a sourdough recipe to a beginner who’s just starting on their sourdough journey this classic sourdough bread recipe would be it. I started my sourdough journey about 5 years ago and this recipe is the one I learned with. This recipe is a great jumping off point and is the perfect foundation when you want to start experimenting with other types of flours. This recipe uses just three ingredients, water, flour and salt.
What type of flour to pick for this classic sourdough bread:
I think starting out with a good quality, simple, all-purpose flour is a great way to get a feel for how sourdough works. I suggest picking a good quality, organic, unbleached all-purpose flour that hasn’t been enriched. (Enriched means they took good things out of the flour and then added things back in.) The protein content of the flour is important too. The higher the protein the more alive your sourdough will be and you will get a bigger rise on your loaf.
Ingredients you will need for classic sourdough bread:
- 125 grams bubble active sourdough starter (I suggest feeding your starter the night before)
- 735 grams lukewarm water
- 25 grams salt
- 1000 grams all-purpose flour
Directions:
- 1.) In the morning add your active bubbly sourdough starter into a large bowl. Add the water and whisk together until well combined and the starter has dissolved in the water.


- 2.) Add the salt and flour and start stirring together. Once the cooking starts to come together finish mixing with your hands. You will have a very sticky, shaggy dough. Cover with a damp kitchen towel and let rest for 1 hour.


- 3.) After the dough has rested for an hour you will start a series of stretch and folds. Grab a portion of dough and pull up to stretch it out then fold back over the rest of the dough. Repeat three more times around the dough. Cover with the damp kitchen cloth for 30 minutes and then repeat the stretch and folds 3 more times with 30 minutes in between the each set of stretch and folds.


- 4.) After you have completed all the stretch and folds cover the dough with damp kitchen towel and put in a warm place in your kitchen. For 4-8 hours until the dough has doubled in size.
- 5.) Prepare two sourdough proofing baskets (you can also use two mixing bowls if you don’t have sourdough baskets) by lining them with tea towels and dusting the towels with a little bit of flour.

- 6.) “Pour” the dough out onto your work surface and cut in half. Shape each half into a round loaf by rolling the dough up and then using your hands to roll the dough on the counter with a dragging motion to create tension over the surface of the ball of dough. Turn the shaped dough over and place in the prepared sourdough basket. Repeat with the second loaf. Cover the baskets (or bowls) with plastic wrap or you can even use a shower cap. Place in the fridge to proof overnight, or 12 hours.


- 7.) In the morning preheat your oven to 475° and place an oven safe 6 quart Dutch oven in the oven with the lid on to preheat as well.
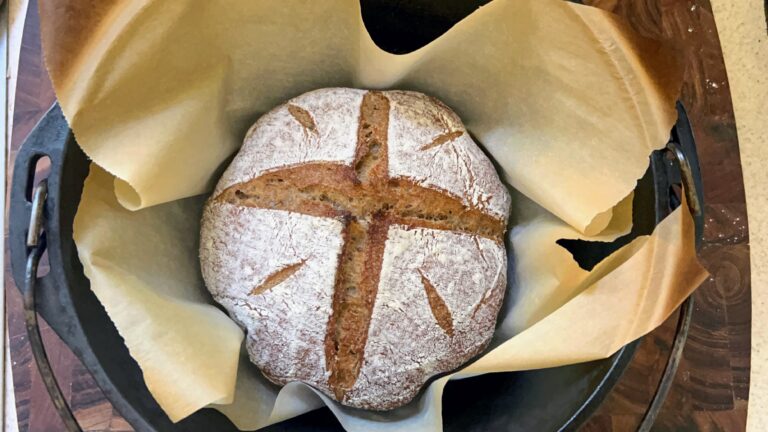
- 8.) Place a piece of parchment paper on your work surface and turn the dough out onto the parchment paper. Dust the top of the loaf with a little bit flour. With a razor blade or very sharp knife, score the dough. You can be as simple or as fancy as you like. I recommend a simple X across the top do the dough when you are just starting out.


- 9.) Remove the dutch oven from the preheated oven and use the edges parchment paper to carefully lift the loaf into the Dutch oven. Place the lid back on the Dutch oven and put back in the oven.
- 10.) Bake at 475° for 25 minutes then remove the lid, place back in the oven uncovered, lower the oven temp to 450° and bake for another 20 minutes.
- 11.) Remove from the oven and use the edges of the parchment to remove the loaf from the Dutch oven and place on a wire rack to cool. Let the bread cool completely before slicing otherwise it will be gummy if cut while it’s still hot. Enjoy!

Pin for later!

Classic Sourdough Bread

If I were to recommend a sourdough recipe to a beginner who’s just starting on their sourdough journey this classic sourdough bread recipe would be it. I started my sourdough journey about 5 years ago and this recipe is the one I learned with. This recipe is a great jumping off point and is the perfect foundation when you want to start experimenting with other types of flours. This recipe uses just three ingredients, water, flour and salt.
Ingredients
- 125 grams bubble active sourdough starter (I suggest feeding your starter the night before)
- 735 grams lukewarm water
- 25 grams salt
- 1000 grams all-purpose flour
Instructions
- 1.) In the morning add your active bubbly sourdough starter into a large bowl. Add the water and whisk together until well combined and the starter has dissolved in the water.
- 2.) Add the salt and flour and start stirring together. Once the cooking starts to come together finish mixing with your hands. You will have a very sticky, shaggy dough. Cover with a damp kitchen towel and let rest for 1 hour.
- 3.) After the dough has rested for an hour you will start a series of stretch and folds. Grab a portion of dough and pull up to stretch it out then fold back over the rest of the dough. Repeat three more times around the dough. Cover with the damp kitchen cloth for 30 minutes and then repeat the stretch and folds 3 more times with 30 minutes in between the each set of stretch and folds.
- 4.) After you have completed all the stretch and folds cover the dough with damp kitchen towel and put in a warm place in your kitchen. For 4-8 hours until the dough has doubled in size.
- 5.) Prepare two sourdough proofing baskets (you can also use two mixing bowls if you don’t have sourdough baskets) by lining them with tea towels and dusting the towels with a little bit of flour.
- 6.) “Pour” the dough out onto your work surface and cut in half. Shape each half into a round loaf by rolling the dough up and then using your hands to roll the dough on the counter with a dragging motion to create tension over the surface of the ball of dough. Turn the shaped dough over and place in the prepared sourdough basket. Repeat with the second loaf. Cover the baskets (or bowls) with plastic wrap or you can even use a shower cap. Place in the fridge to proof overnight, or 12 hours.
- 7.) In the morning preheat your oven to 475° and place an oven safe 6 quart Dutch oven in the oven with the lid on to preheat as well.
- 8.) Place a piece of parchment paper on your work surface and turn the dough out onto the parchment paper. Dust the top of the loaf with a little bit flour. With a razor blade or very sharp knife, score the dough. You can be as simple or as fancy as you like. I recommend a simple X across the top do the dough when you are just starting out.
- 9.) Remove the dutch oven from the preheated oven and use the edges parchment paper to carefully lift the loaf into the Dutch oven. Place the lid back on the Dutch oven and put back in the oven.
- 10.) Bake at 475° for 25 minutes then remove the lid, place back in the oven uncovered, lower the oven temp to 450° and bake for another 20 minutes.
- 11.) Remove from the oven and use the edges of the parchment to remove the loaf from the Dutch oven and place on a wire rack to cool. Let the bread cool completely before slicing otherwise it will be gummy if cut while it’s still hot. Enjoy!
Check out my YouTube channel and subscribe! www.youtube.com/@homespunannie


Wow, that looks so delicious! I love your step-by-step instructions, they are so easy to follow, and makes me think I can do this! I’ve learned to make sourdough a different way, but want to try your way next time!