Cottage Waist Apron

*Please note that while this is an easy sewing project I have written the instructions assuming you already have a basic knowledge of sewing clothing. This is not a tutorial for the complete beginner.*
If you are wanting a fun sewing project that is simple enough that it doesn’t require a pattern and then this cottage waist apron is for you! This is a great sewing project to play around with and get creative. If you don’t want pockets then you don’t have to add them. If you want just one pocket or one big pocket then do that. Add some pretty trim or buttons. Have fun with it!
Materials and tools you will need:
- Pretty fabric of choice. I like to use a complementary fabric for the waist band and pockets. (the amount of fabric you will need will depend on your measurements which I will explain below)
- Sewing machine
- Thread that compliments your fabric of choice
- Sewing tape measure (aka flexible, cloth-based ruler)
- Fabric scissors
- Iron and ironing board (for keeping fabric and seams pressed and neat)
- Sewing pins
- Optional: Pretty trims, lace, buttons, ad-ons of choice, etc.
Steps for making this cottage waist apron
Step 1: Measure
- The first thing you are going to want to do is measure yourself or the person you are making the apron for to know how much fabric you will need.
1.) Waist: Because this is a waist apron it is going to be tied at your true waist which is right under your bust. Using the sewing measuring tape measure your waist under your bust. Take that number and add 30 to it. This will give you the length for the waist band. For example if your true waist measures at 35 inches you will add 30 inches to that and you will cut a 65 inch strip for your waist band. **You may need to cut two strips and sew two ends together if your fabric isn’t long enough for one continuous strip. Simply halve your total waist band length, cur two strips at that length and sew two ends together.**
2.) Width: Measure around the widest part of your hips. This will typically be around the middle of your rear end. SUBTRACT 10 inches from this number and you will have the width at which to cut the apron skirt. For example if the widest part of your hips is 40 inches, subtract 10 and you will cut a 30 inch wide piece of fabric for the apron skirt.
3.) Length: Measure from your true waist down to where you would like the apron skirt to end. You can make it as long or as short as you would like. Make sure to add 2 inches for the hem and basting stitching for the waist of the skirt.
4.) Pockets: Pockets are optional and it’s up to you how big or small you would like them to be. Just make sure that whatever size you choose that you add 1-2 inches for the seam allowance.
Step 2: Cut your fabric
- The amount of fabric you will need for the cottage waist apron all depends on your measurements. I like to use complementary fabrics for the waist band and pockets but of course do whatever you would prefer.

1. ) Cut out the skirt of the apron based on the measurements you took. If you are using a fabric that has a directional pattern make sure you are cutting out the fabric with the pattern in the direction you would like it to go on the apron. For example if you are using a striped fabric do you want the stripes to run horizontally or vertically on the finished apron?
2.) For the waist band you are going to want to cut the width of the waist band double the width of the finished waist band. For example, I like to have about a 4 inch wide waist band when the apron is finished so I cut the waist band 8 inches wide. **As mentioned above, depending on your measurements you may need to cut two strips if your fabric isn’t long enough.
3.) If you are wanting pockets cut them out to your desired size making sure to add 1-2 inches for seam allowance.
Step 3: Prepare edges for stitching and stitching edges, hem and top of pockets
- Make sure you have your sewing pins out and ready for this step because you are going to be doing a lot of pinning.
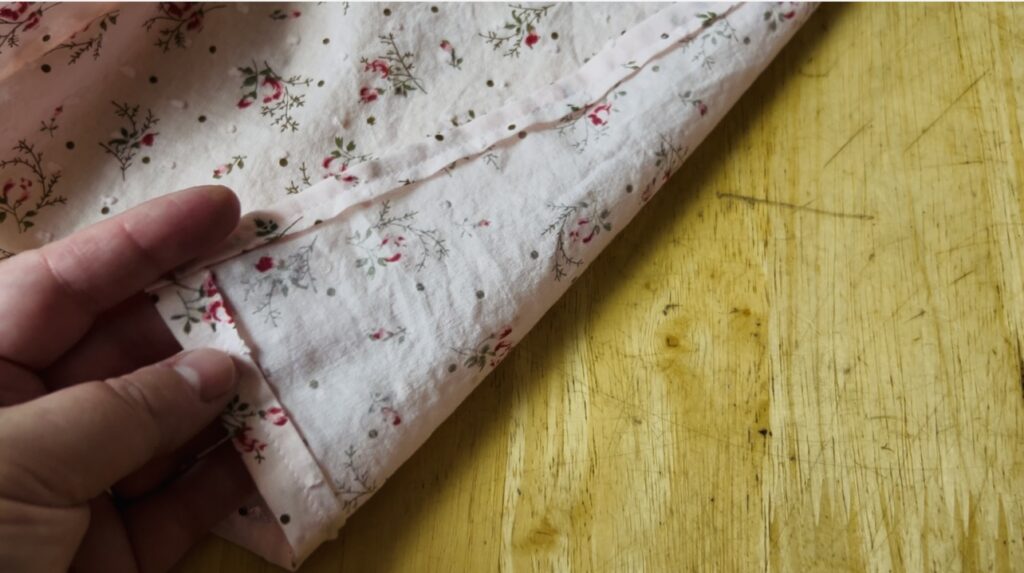
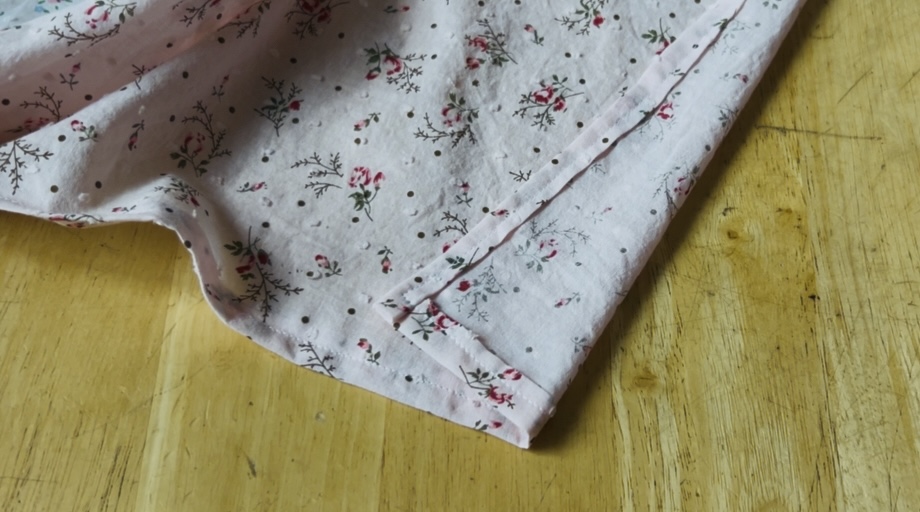
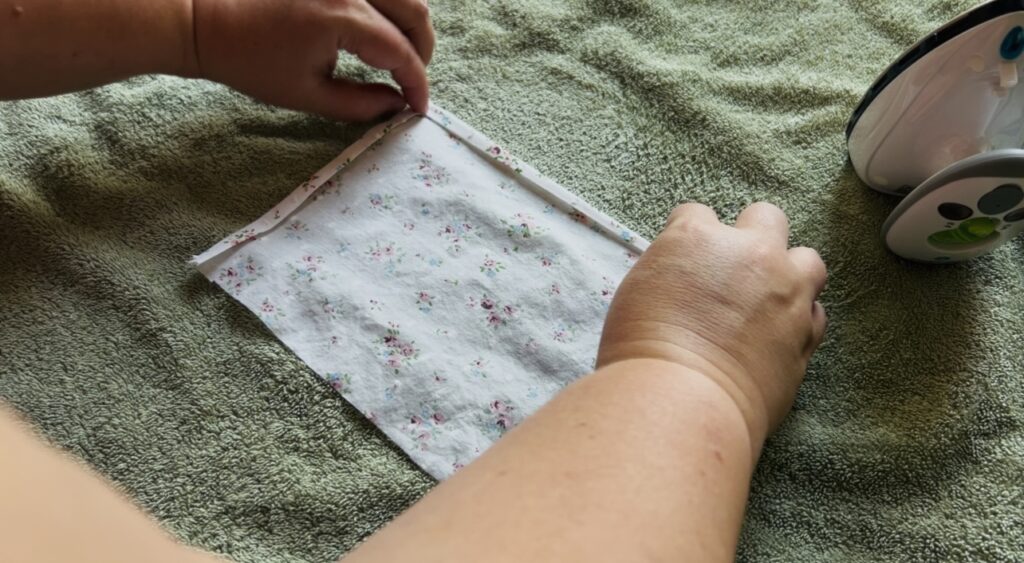
1.) Starting with the apron skirt take one side edge and fold a 1/4 inch towards the backside of the fabric, ironing it flat as you move down the edge of the fabric. Then you are going to fold over the same edge another 1/4 of an inch and ironing it flat as you move down the edge of the fabric. Folding over the edge of the fabric twice keeps the raw edge from fraying. Pin the edge down every 2-3 inches to hold it in place. Repeat with the other side of the apron skirt. After both sides have been folded, pressed and pinned do this same process with the bottom edge (hem) of the apron skirt.
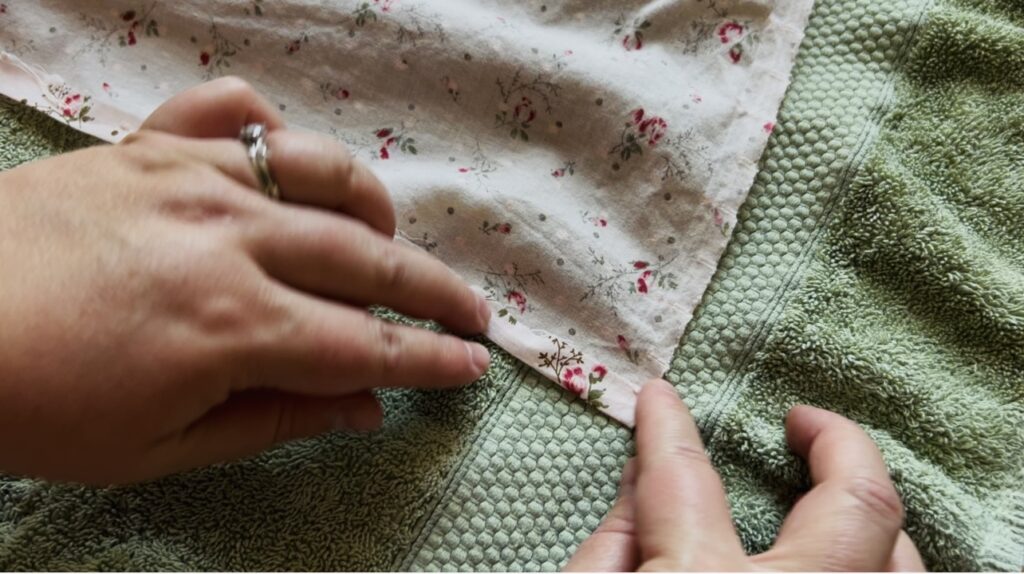


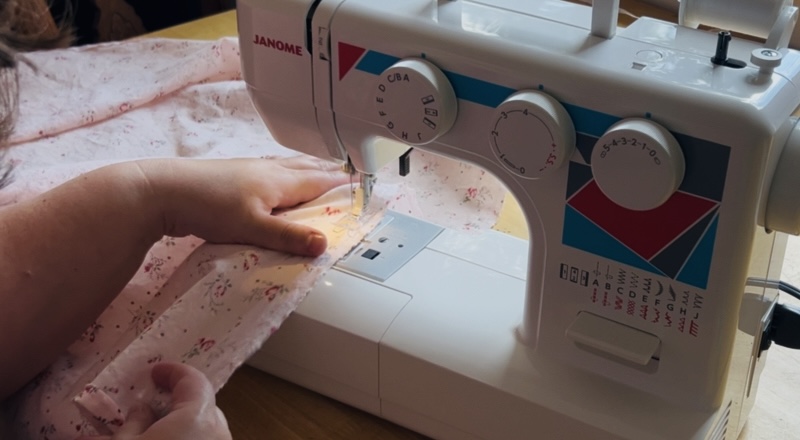
2.) Straight stitch down the middle of the 1/4 inch fold you just made around the sides and bottom of the apron skirt. When you reach the corners make sure to leave the needle down in the fabric, lift the presser foot and rotate the fabric to line up with the middle of the 1/4 inch fold, lower the presser foot back down and continue sewing. This insures a continuous stitch around the sides and bottom the apron skirt.

3.) For the pockets you are going to do the same thing to the edges that you just did in steps 1 and 2 for the apron skirt. Once you have the pockets edges folded and pressed then you are going to sew a straight stitch along JUST THE TOP EDGE of the pocket. Set them aside for later.


4.) Repeat the folding and pressing along all the edges of the waist band and set aside for later.

Step 4: Sewing on the pockets
- If you are not adding pockets then skip this step and move on to step 5.
1.) Lay out your apron skirt fabric with the right side up. Place your pockets with the right side up onto your apron skirt. Adjust the pocket placement until they are where you would like them on the apron skirt and then pin down the sides and bottom of the pockets to the apron skirt. You don’t need to pin the top since it will be the opening of the pocket.


2.) Using a straight stitch sew along the sides and bottom of the pocket (REMEMBER NOT TO SEW THE TOP SHUT) sewing it to the apron skirt.

Step 5: Basting stitch along the top of the apron skirt for gathering
- You should have a raw edge along the top the apron skirt where you did not fold, press and sew like you did the sides and bottom.
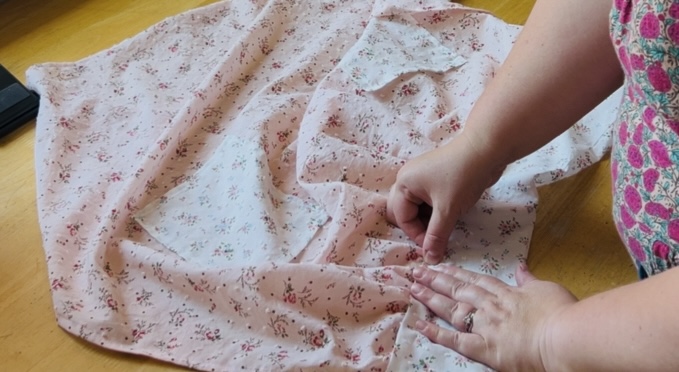
1.) Set your sewing machine to the basting stitch and stitch along the top of the apron skirt with a 1/4 inch allowance. Sew a second line of the basting stitch across the top of the apron skirt again with a 1/4 inch space between the two rows of stitching.

2.) Start pulling on the top string of each basting stitch to start gathering the top of the apron skirt. Make sure to hold the skirt up to your true waist periodically to make sure it’s gathered the right amount that makes you happy. Play around with the gathering until it’s spread evening along the top of the apron skirt and to your liking. Set the apron skirt aside for later.


Step 6: Prepare the waist band and sew to the apron skirt
- All the edges of the waist band should be folded and pressed as detailed in Step 3.
1.) Fold the right sides of the waist band together in half lengthwise and press with the iron.
2.) Sew a straight stitch along each end of the waist band enclosing just the ends.
3.) Turn the waist band right side out.

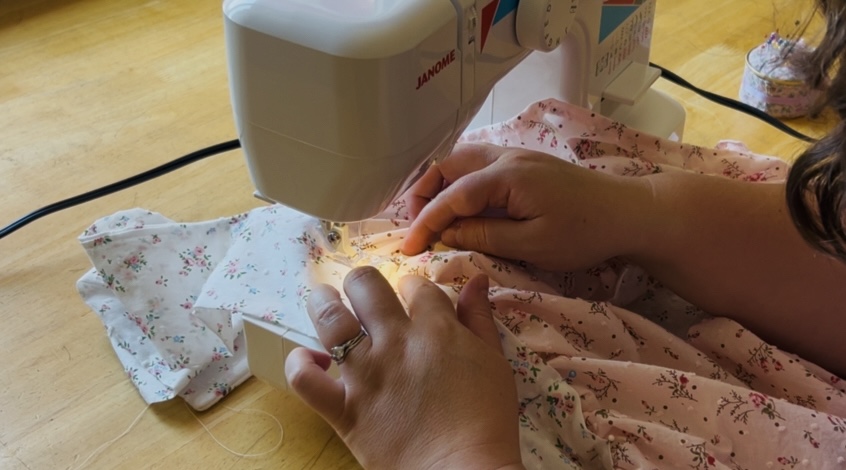
4.) The bottom edge of the waist band will be open. Enclose the top of the apron skirt with the open edge of the waist band making sure to cover the two basting stiches with the waist band. Pin the center of the waist band to the center top of the apron skirt. Pin the rest of the waist band to the top of the apron skirt making sure to cover the two basting stitches.

5.) Starting at one end of the bottom edge of the waist band and using a straight stitch enclose the top the apron skirt with the waist band finishing at the other end of the waist band. Stay as close to the edge of the waist band as possible.


Enjoy your finished cottage waist apron!


I had enough fabric leftover to make Miss Lucy a little cottage waist apron of her own! To make one for a little girl simply follow the directions exactly the same.


Pin for later!

Cottage Waist Apron

Instructions
Step 1: Measure
- The first thing you are going to want to do is measure yourself or the person you are making the apron for to know how much fabric you will need.
1.) Waist: Because this is a waist apron it is going to be tied at your true waist which is right under your bust. Using the sewing measuring tape measure your waist under your bust. Take that number and add 30 to it. This will give you the length for the waist band. For example if your true waist measures at 35 inches you will add 30 inches to that and you will cut a 65 inch strip for your waist band. **You may need to cut two strips and sew two ends together if your fabric isn't long enough for one continuous strip. Simply halve your total waist band length, cur two strips at that length and sew two ends together.**
2.) Width: Measure around the widest part of your hips. This will typically be around the middle of your rear end. SUBTRACT 10 inches from this number and you will have the width at which to cut the apron skirt. For example if the widest part of your hips is 40 inches, subtract 10 and you will cut a 30 inch wide piece of fabric for the apron skirt.
3.) Length: Measure from your true waist down to where you would like the apron skirt to end. You can make it as long or as short as you would like. Make sure to add 2 inches for the hem and basting stitching for the waist of the skirt.
4.) Pockets: Pockets are optional and it's up to you how big or small you would like them to be. Just make sure that whatever size you choose that you add 1-2 inches for the seam allowance.
Step 2: Cut your fabric
- The amount of fabric you will need for the cottage waist apron all depends on your measurements. I like to use complementary fabrics for the waist band and pockets but of course do whatever you would prefer.
1. ) Cut out the skirt of the apron based on the measurements you took. If you are using a fabric that has a directional pattern make sure you are cutting out the fabric with the pattern in the direction you would like it to go on the apron. For example if you are using a striped fabric do you want the stripes to run horizontally or vertically on the finished apron?
2.) For the waist band you are going to want to cut the width of the waist band double the width of the finished waist band. For example, I like to have about a 4 inch wide waist band when the apron is finished so I cut the waist band 8 inches wide. **As mentioned above, depending on your measurements you may need to cut two strips if your fabric isn't long enough.
3.) If you are wanting pockets cut them out to your desired size making sure to add 1-2 inches for seam allowance.
Step 3: Prepare edges for stitching and stitching edges, hem and top of pockets
- Make sure you have your sewing pins out and ready for this step because you are going to be doing a lot of pinning.
1.) Starting with the apron skirt take one side edge and fold a 1/4 inch towards the backside of the fabric, ironing it flat as you move down the edge of the fabric. Then you are going to fold over the same edge another 1/4 of an inch and ironing it flat as you move down the edge of the fabric. Folding over the edge of the fabric twice keeps the raw edge from fraying. Pin the edge down every 2-3 inches to hold it in place. Repeat with the other side of the apron skirt. After both sides have been folded, pressed and pinned do this same process with the bottom edge (hem) of the apron skirt.
2.) Straight stitch down the middle of the 1/4 inch fold you just made around the sides and bottom of the apron skirt. When you reach the corners make sure to leave the needle down in the fabric, lift the presser foot and rotate the fabric to line up with the middle of the 1/4 inch fold, lower the presser foot back down and continue sewing. This insures a continuous stitch around the sides and bottom the apron skirt.
3.) For the pockets you are going to do the same thing to the edges that you just did in steps 1 and 2 for the apron skirt. Once you have the pockets edges folded and pressed then you are going to sew a straight stitch along JUST THE TOP EDGE of the pocket. Set them aside for later.
4.) Repeat the folding and pressing along all the edges of the waist band and set aside for later.
Step 4: Sewing on the pockets
- If you are not adding pockets then skip this step and move on to step 5.
1.) Lay out your apron skirt fabric with the right side up. Place your pockets with the right side up onto your apron skirt. Adjust the pocket placement until they are where you would like them on the apron skirt and then pin down the sides and bottom of the pockets to the apron skirt. You don't need to pin the top since it will be the opening of the pocket.
2.) Using a straight stitch sew along the sides and bottom of the pocket (REMEMBER NOT TO SEW THE TOP SHUT) sewing it to the apron skirt.
Step 5: Basting stitch along the top of the apron skirt for gathering
- You should have a raw edge along the top the apron skirt where you did not fold, press and sew like you did the sides and bottom.
1.) Set your sewing machine to the basting stitch and stitch along the top of the apron skirt with a 1/4 inch allowance. Sew a second line of the basting stitch across the top of the apron skirt again with a 1/4 inch space between the two rows of stitching.
2.) Start pulling on the top string of each basting stitch to start gathering the top of the apron skirt. Make sure to hold the skirt up to your true waist periodically to make sure it's gathered the right amount that makes you happy. Play around with the gathering until it's spread evening along the top of the apron skirt and to your liking. Set the apron skirt aside for later.
Step 6: Prepare the waist band and sew to the apron skirt
- All the edges of the waist band should be folded and pressed as detailed in Step 3.
1.) Fold the right sides of the waist band together in half lengthwise and press with the iron.
2.) Sew a straight stitch along each end of the waist band enclosing just the ends.
3.) Turn the waist band right side out.
4.) The bottom edge of the waist band will be open. Enclose the top of the apron skirt with the open edge of the waist band making sure to cover the two basting stiches with the waist band. Pin the center of the waist band to the center top of the apron skirt. Pin the rest of the waist band to the top of the apron skirt making sure to cover the two basting stitches.
5.) Starting at one end of the bottom edge of the waist band and using a straight stitch enclose the top the apron skirt with the waist band finishing at the other end of the waist band. Stay as close to the edge of the waist band as possible.
Enjoy your finished cottage waist apron!
Check out my YouTube channel and subscribe! www.youtube.com/@homespunannie